|
Here is a fantastic article that explains issues with steel columns. I see these A LOT in new homes and older homes. Sadly, I see them in home where they don't have a proper footing under them and are not attached at either end and rely on the weight of the structure to hold them in place. Read on and be safe with your home.
Adjustable Steel Columns by Nick Gromicko and Kenton Shepard Adjustable steel columns, also known as screw jacks and beam jacks, are hollow steel posts designed to provide structural support. An attached threaded adjustment mechanism is used to adjust the height of the post. A few facts about adjustable steel columns:
That “perfect” four-bedroom, two-bath house you stumbled upon in a beautiful suburban neighborhood could hide some serious problems. The best way for homebuyers to find out about potential issues is with a good home inspection.
In fact, you’ll have to get a home inspection to meet mortgage lenders’ requirements before you buy. But not all licensed inspectors will thoroughly inspect and report on your potential home’s defects. So before you hire the first home inspector you find on Google or whoever your Realtor or lender suggests, do your homework. It’s acceptable to interview a home inspector before you decide to drop $300 or more on the inspection fee. Here are the seven most important questions to ask before you schedule a home inspection: 1. Are you a member of a professional inspection organization? Reputable home inspectors will be members of one of these organizations: the National Association of Home Inspectors, the American Society of Home Inspectors or the International Association of Certified Home Inspectors. Many states also have statewide associations, which are acceptable alternatives. Each organization has certification and licensing procedures and requires members to follow procedural and ethical standards when conducting home inspections. Membership to one of these organizations doesn’t guarantee a home inspector is an expert, but you should probably rule out any inspectors who aren’t members of a respected professional organization. 2. What’s your background? The best home inspectors are typically those who have experience in the building industry. You want to work with an inspector who knows what’s inside the walls of your home and understands the basics of local building codes and requirements. (Note: A home inspector will not be able to tell you if every single plumbing, electrical and/or structural aspect of your potential home is up to the latest codes. For this, you’ll need a more specialized inspection by a licensed plumber, electrician or contractor.) Background is especially important if you’re planning to purchase an older home, as inspectors may need to look for problems in older homes that are uncommon in newer properties. So if you’re buying an older home – or a fixer-upper – find an inspector with a background in inspecting similar homes. 3. How much experience do you have? It’s OK to work with a rookie home inspector who has a background in construction or home repair. But be sure you hire someone who has, at the very least, undergone extensive training – or who will have the assistance of a more experienced inspector during the inspection. 4. How long will the inspection take? On average, a home inspection should take two to three hours to perform. If you’re dealing with a large home, a fixer-upper or an older home, the inspection should take even longer. Don’t hire someone who promises to be in and out within an hour or two, as this is too short a time to thoroughly inspect a home. 5. What will you inspect? Keep in mind that it’s not a home inspector’s job to inspect things that can’t be seen. The inspection won’t reveal any wiring problems hidden behind drywall or any mold problems under the shower tiles. With that said, an inspector should evaluate every possible visible place in your home, including the roof, basement and attic. And the home inspector should be in physical shape to access these places, even if a ladder or flashlight is required. An inspector should also look at things such as the water heater, furnace and electrical box. Again, the inspector may be unable to tell you if your home’s systems are up to local codes. But the professional should have enough knowledge to inform you if the systems are safe or in need of major repairs. 6. Can I attend the inspection? A refusal to this simple request is a red flag. A home inspection is a fabulous opportunity to learn about your home and talk about any possible repairs that may be needed. A good inspector will take you along on the inspection, if you wish. A great inspector will talk you through everything he sees. 7. What kind of inspection report do you offer? Most inspectors will provide a report within 24 hours. It’s important to be sure the inspector’s reporting style will meet the requirements of your lender as well as your own personal preferences. Ask to see samples of their previous home inspections if you aren’t sure. Of course, you’ll also want to ask about the inspector’s fees and schedule. But before you get to those, find the right inspector by asking these seven questions. Weigh Your Options Before a Do-it-Yourself Remodel
According to HUD and the U.S. Census Bureau, home owner do-it-yourself (DIY) projects accounted for 37 percent of all home remodeling projects performed nationwide from 2010-2011. While most professional remodelers understand that home owners will do some of their own home repairs or small renovations, after repairing many a DIY gone awry they overwhelmingly believe that many jobs should be left to the pros. The desire among home owners to tackle repair and remodeling projects has risen with the popularity of Pinterest and design blogs and the prevalence of home improvement stores. Before attempting to recreate the gorgeous bathroom from your Pinterest board in your own home, consider the following before sinking your resources into the project. Safety Without the proper training and preparation, a DIYer can and has landed in the emergency room. Unfamiliarity with new tools and techniques can lead to life-threatening accidents. Follow product directions and safety procedures and always use proper safety equipment. A good rule of thumb for any home owner is to avoid projects that require a license. Veteran remodelers advise against doing electrical or plumbing work on your own and avoid making structural changes to walls, roofs and floors. You run the risk of compromising the structural integrity of your home and having a large hole in your roof or floor. Leave this work in the hands of professionals with the proper training. Even projects that appear simple like laying floor tile can result in you stubbing your toes every time you are in that room if improperly installed. Time DIYers often tackle larger projects than they can handle before the holidays so that visiting family can enjoy the updates. But when something goes wrong, there is no one to hold to the deadline. Hiring a professional will ensure that you have a contract with a completion date and that the remodeler will bring in whatever help is necessary to get the job finished on time. Even professional remodelers sometimes need extra time on projects when they find surprises behind walls. Troubleshooting these issues often takes more time and expertise than originally planned. If timing is a priority for your weekend warrior, call a professional remodeler to get your project completed. Cost Purchasing new tools is exciting but consider the price of all the specialty tools used for a one-time project when they are sitting untouched in your garage for a few years. Additionally, many of the products purchased for the DIY market, although designated by a name brand, are not always the same quality available to contractors. It is also important to verify the terms of the product warranty. Many warranties become void by improper installation. Robert Criner, GMR, CAPS, CGP of Criner Remodeling in Yorktown, Va. cautions all motivated DIYers, “Does it really pay to do the job twice when you can pay a professional to do it once?” There are some home projects that professional remodelers believe can be tackled by determined DIYers such as hanging pictures, interior painting, caulking, changing door knobs and cabinet pulls, and some aesthetic work (depending on skill level) such as installing crown molding. Just consider the safety risks, time and cost involved in a DIY project of any size. Still think you can tackle a big remodeling project? Just remember, DIY projects should be fun and suit your skill level. If they’re not, then consider hiring a professional. Remember that your home is an investment and when you go to sell it you really should have something that someone will want to purchase. Tonight is Day Light Savings Time and we fall BACK. Of course you will be setting your clocks back one hour and of course you will be changing your smoke and carbon monoxide detector batteries and if you are not doing the later you should be. While you are at it you should check the expiration date on your detector. If you are unsure how to check the date this video will show you how and tell you why it is important. If you can't change your batteries or change your detectors if they are hard wired (and they need to have the batteries changed too -- so do it) you can contact me and I would be happy to do that as part of a service call. Your detectors may not be doing what you are depending on them to do when it really matters - alert you to a fire or carbon monoxide and save your life and the lives of your family. Well, today was no big surprise. Same old same old. Homeowner was complaining about mold and mildew growing on the walls and ceilings of their bathroom. I won't even go into the fact that the ceiling tile in the bathroom was not rated for moist areas (like a bathroom, but they bought it because it was on sale at Menards a few years ago. That is a discussion for another day.)
So, the first thing I ask, and check on, is the exhaust fan working? So, we flick the switch and sure enough the fan is working. Next I take a closer look and the fan cover has more dust and hair on it than a dirty cat in a desert storm. So, together we clean the cover, change the burned out light bulb and remove the moldy ceiling tile. Upon removing the last piece of tile around the fan I notice that someone stole the vent pipe and the vent to the outside. (Ok, being silly here. Who 'steals' this?) Unfortunately the do-it-yourself previous homeowner put this in and didn't properly vent the fan to the outside. Basement fans get exhausted through the floor rim joist and upper floors through the roof or side wall. This just vented to the joist space. Upon further investigation of the joist space I found, you guessed it, MORE mildew and mold. Here is the magic formula for this: moisture plus warmth plus organic source (like wood, ceiling tile and drywall) equals mold growth. If you remove any of those from the equation you remove the problem. The exhaust fan can remove the moisture from the room. So, I connected a vent pipe to a new through the joist vent and turned on the fan. The home owner was impressed how fast the odor in the room left. They thought that the whole fan needed to be replaced because of the mold and mildew issue. No actually. Just hooked up. I showed them that the 60 cu. ft. per minute rated fan they had was plenty for the five by eight room. Length x width x height of room Then multiply by 8 because bathroom should have 8 air changes per hour. Then divide by 60 because we went to know how many Cubic Feet Per Minute (CFM) fan we should have. 8ft x 5ft x 8ft =320 cubic feet of room volume 320 x 8 air changes per hour = 2560 cu ft per hour 2560 / 60 minutes per hour=42.67 cfm so the 60 cfm rated fan they had was plenty of "fan" for the job, it just needed to be hooked up and of course kept clean. Imagine if you had a hairball in your throat, would you breath very well? Well, that is all for now. I hope that something in this little story "Hit Home" with you. 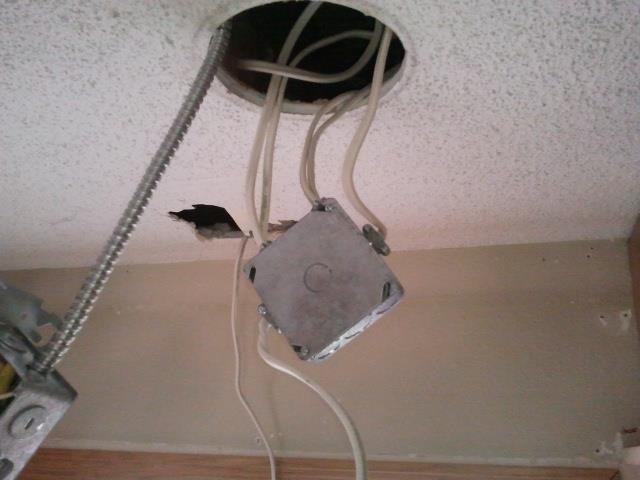 A few weeks ago on a living room remodel the customer requested minor electrical be done to 'update' the room. We added a few can lights over a beautiful fireplace, relocated some outlets and added a ceiling fan/light to the center of the room to move that new heat source around the room in the winter time and help with air circulation in the summer. Well, while we were adding the fan box we found junction boxes like this above the ceiling that were not accessible. Under the Residential Electrical Code junction boxes can not be "inaccessible". What made matters worse was that the boxes we found were grossly over loaded with wires. Each box has a limit which is called "box fill". Each wire of each size has a certain number of cubes. Each box has a maximum cube rating. Packing wires into a box just causes problems and it did in this case. We removed this box from the circuit and ended up rewiring not only the lights in the living room but also the kitchen. The unsafe conditions in this home were repaired, in fact, the local electrical inspector THANKED me and the electrician for fixing this. This work that was done previously was done without a permit and not inspected. It was a safety hazard to the home. Please hire a qualified contractor for all of your work. Doing otherwise will only cause you issues later.
I worked on the kitchen shown below before Christmas. She called me back to do the back splash now. This was the wonderful lady who called the wrong number for a contractor to bid on her kitchen and ended up with me. I don't think that this other guy has called her back yet even and I've had 2 jobs from her. His loss. She is just a peach and one of my favorite customers. This is glass mosaic tile. It was about $9.00 a 12" x 12" sheet plus thinset and grout. Not really a do-it-yourself job if you don't have a diamond blade for a grinder and a grout float. The sheet tile were pretty easy to install and were a bit forgiving on this slightly uneven wall. It will need to have the grout sealed in the next week or so after the grout cures. This will help keep the grout joints looking new and make it easier to clean. That part is a very easy DIY job and better off left to the customer. No sense in calling me back to do this easy job. Besides, it should be done every so often anyway. This is a good time to replace the old dirty outlets. We did that on this job too. Man it looks nice. The photos don't do it justice. Since it is glass tile you can actually look at them and almost seem to see through them. This is one reason to use WHITE thinset as it will reflect the light back out. The joint at the countertop is a caulked grout joint. Special sanded caulk to match the grout. This "gives" a little with any movement of the counter top due to slamming doors, dropping things on it, or movement in the floor. She will enjoy this for YEARS now. Up next... BATHROOM! 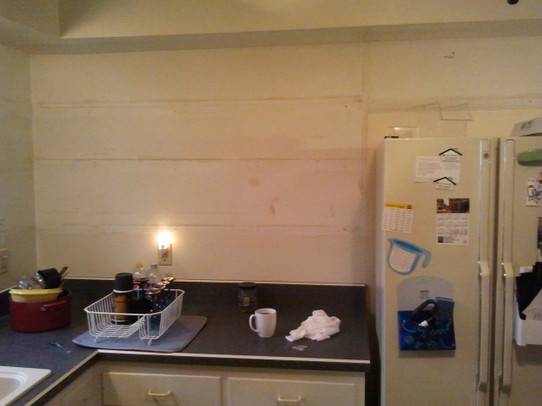 Here is the kitchen prior to new cabinets.  Here is the kitchen with new cabinets. But we are not done just yet.  Isn't it amazing what a mosaic tile back splash can do for a kitchen?   This week I did an extensive refresh to a 2nd floor master suite. Stripped the wall paper, prepped the existing trim and walls for new paint, added trim that was missing. This room just wasn't helping all the rest of the improvements we did to the home to sell it.  Here is the room before. Ugly, torn wallpaper and a color scheme that just wasn't working. Missing trims and dated fixtures. 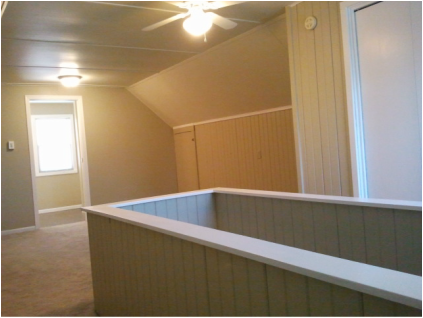 BAMM! (borrowed from Emeril) A grey/green paint with the darker shade on the bottom and the lighter on the slanted and flat ceiling. The trims were all caulked and painted to give it a professional quality finish. We picked the light color first and then stayed on the same card for the accent. This is a pretty good rule of thumb to follow when selecting multiple colors in the room. 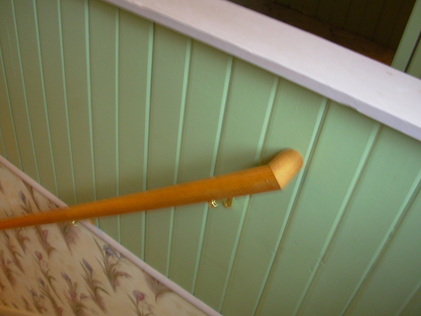 Check out the trim and the accents on this knee wall.  New chair rail trim and white accent paint gave this 1940s home a real sprucing up. Bye, bye wall paper.  Before.....  After.... simple and clean. Ready for a new owner to decorate with their own items, not a paint can.
All of the walls were primed first to ensure that the old color would not bleed through and that the new coats of paint would stick. The primer also seals in any pet odors.  I was hired by a family to "gift" a new kitchen to a relative. This really kind of turned into our own little version of "Extreme Home Makeover". You could actually see into the walls from inside the cabinets. This lady deserved it and what a wonderful gift to get from her family members. Everyone chipped in and also worked on parts of this project. I was in charge of coordinating and repairing walls, ordering new cabinets and installing the finished product and other carpentry. Above is the kitchen "BEFORE" we started. 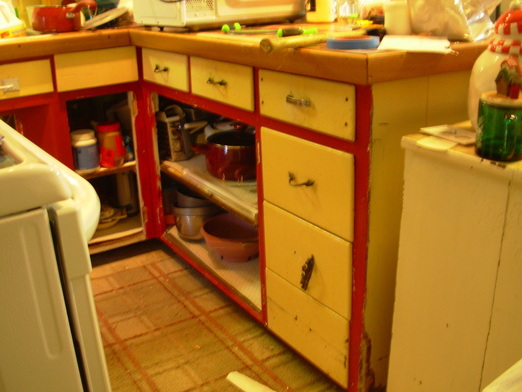 The drawers were in such bad shape that you couldn't even open them. The handles, and in some cases the entire drawer front, would just pull off. The doors just fell off too several years ago. The counter top was de-laminating and wasn't the best thing to prepare a meal on.  This is the finished product. To save money we got basic unfinished stock cabinets from the local home store and the family finished them. The cabinets didn't have all the bells and whistles that your usual garden variety cabinets but as you can see this was a DRASTIC improvement. The "tile" you see on the right hand end of the counter will be the tile that the owner will apply as a back splash. The "window" above the sink and the door and trim on the left will be painted too by the family. We were going for a kind of upgraded country kitchen look. The rest of the room has white wainscoting like you see on the back of the peninsula cabinets. I installed a new door to a laundry room / bathroom on the left that will be redone in the future.  A new laminate wood floor was installed by a family member to really finish off this space. The "purple" you see on the wall is the drywall board. It is a mildew and mold resistant product. This is the best thing to put in these old homes and ESPECIALLY in a kitchen and bath. It may cost a few dollars more per sheet, but we only needed 3 sheets. It will be worth the investment. She is going to LOVE this finished product. It was so much fun to see her eyes light up each day when she would come home and see the transformation. I can't wait to hear from her tomorrow after she gets home from her second shift job and sees this. It is all cleaned up and ready to bake cookies with the grand kids again. It is worth all the long hours on this project to see it finally done and usable again. 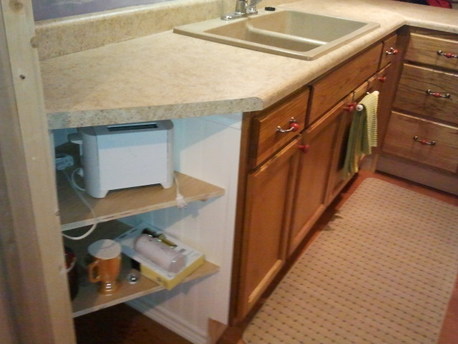 If you would like to discuss some kitchen options in your own home don't hesitate to contact me. Not every kitchen has to look like HGTV. As you can see "simple" can be a definite upgrade. It is amazing how something functional can just make a person feel better too. Trust me. It was magical.
I was recently hired to "refresh" parts of a cute home so it could be put on the market. The original wish list of things from the owner would have put the bill over$28,000 but after pairing down the list to just major work in 5 rooms and some other minor things we got the bill down to under$8,500 and 3 weeks of work for yours truly. This home even had the ducts professionally cleaned while I was there - and man did it need it. 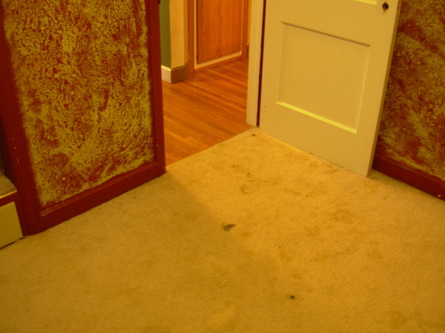 The "textured" paint on the walls was a result of way too much HGTV influence and not enough proper technique and product. They tried to do this over old wallpaper and wondered why it started to peel off the wall. The paper was not primed first with an oil base paint. This would have prepared the surface to accept paint if the paper was properly adhered. As for the red paint, well, a good coat of oil base primer will seal in that color and allow a nice new WHITE color to adhere to it. As for the carpet, well; it was DOA - " doing over anyway". This was so full of "cat" that the oak floor under it had to be painted and sealed just to make the house habitable - well, at least get rid of the odor.  Here you see the same area, but with new paint and texture. The trim was painted with a fresh coat of primer and semi-gloss paint and all joints caulked for a beautiful new look. I have to give the previous owners an "A" for wanting to create a new and unique look, but not with the products and techniques they used. Be bold with your decorative items like rugs, pictures, shelves. Leave the wild paint schemes to HGTV and their crazy renovations. This stuff does not have resale value and really only hurts your asking price in my opinion. But hey, gives me plenty of work to do.  Here we see a nice neutral color, but the intent here was to add stripes. The blue tape would create that effect, but the blue tape would allow the next coat of paint to bleed through on the edges and not have a crisp line. It also peeled off the layer of paint under it because it was not primed prior to painting. You could also see where the paint was splotchy on the white trim because that was not primed to "dull" the glossy surface and allow a good adhesion for the new paint layer. This entire room had to be primed (floor too again) and repainted. The new green "Frog" tape should be used if you were going to create stripes and crisp lines. When applied the edges seal once the new paint hits it. Be careful in your planning and timing of your project. This tape can only be left on the walls for a short period of time. Otherwise it bonds to the surface. PLANNING - very important to a project. 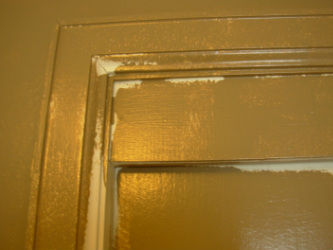  Proper products, technique, and PATIENCE will always give a great looking finished product. For the extra $45 in primer to do this room and about 8 hours it looks great and would have been a result the previous owners would have enjoyed. 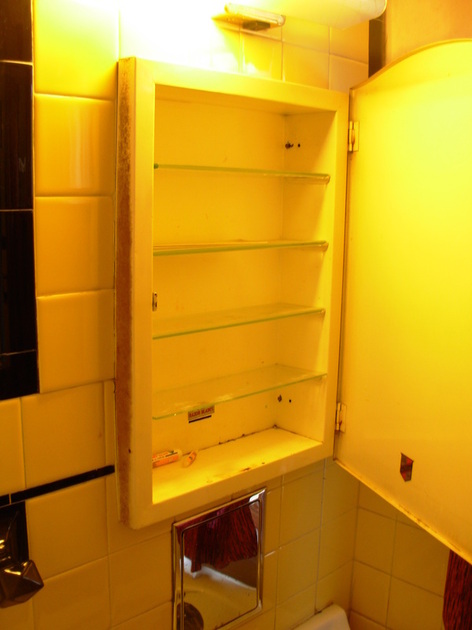 Why buy new when a $4 can of spray paint can turn an ugly old beveled glass medicine cabinet into something that can be reused? My 12 year old son Michael was helping me that day and said, "Dad, look. It has a slot for used razors to go in. It also had a stamp on it that said it was made right here in Waterloo, Iowa. We have to save this. It has history." Classic! It had to be restored. 15 minutes later and this cabinet was ready for another 70 years of service. We even saved the "Made in Waterloo Iowa" sticker. He was so proud of that find.  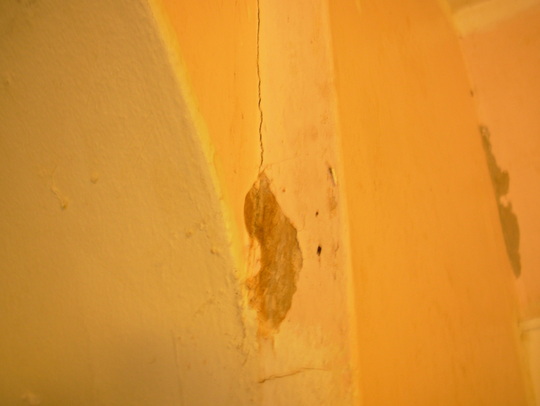 Let's face it, plaster and old paint will eventually crumble and peel, and in a bathroom it will happen faster. Preparing the surface with a good adhesion primer will seal that surface from moisture, and give a good bond to the spray texture for an updated look. I even sealed the texture with another layer of primer so that the finish coats of paint would bond well. This plaster is ready for another 70 years of service to this bathroom now.  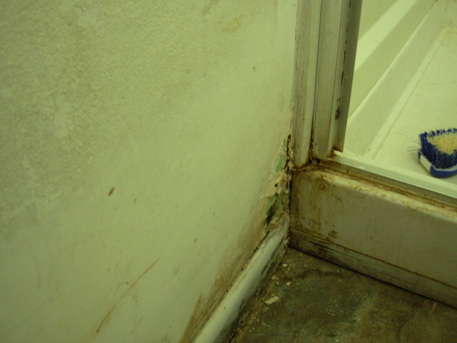 Here we see why you need to do regular maintenance to a home. Sealing joints. Touching up paint. Keeping the place dry by running the exhaust fan (if it is properly vented to the outside of the house) can help prolong the finishes in your home. This area was repaired with mold/mildew resistant joint tape, drywall compound, primer, texture and more primer with the final finish coats of mildew resistant paint. The joints were caulked and the leaky shower door repaired. Using a good quality 25 year caulk can help make all the difference in the world. Proper products and technique again. You just have to do it. Rome wasn't built in a day and you will not repaint a bathroom properly in a day either. This was a 6 day process. While every working hour of those days was not spent on this room, it still takes time for things to cure and dry. Cutting corners just messes up your final product. Below you can see what a little time, the proper products, and a little bit of Jonny B. can do for a crappy wall. All fixed and looks like new. 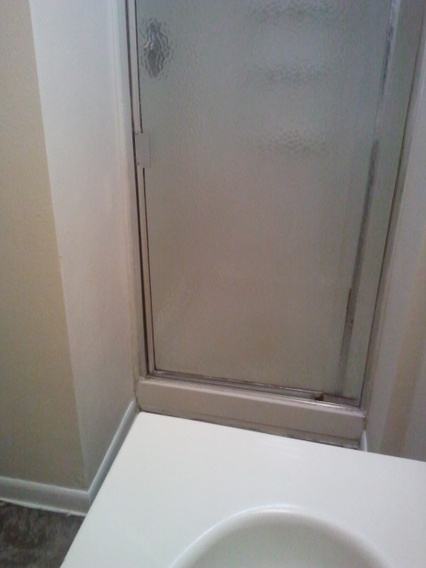 If you like what you have seen here let's talk about how I can help you do your next renovation project - do it the right way for longer lasting results that you can be proud of. Not everyone knows everything, and that is OK. So if you don't know why you should do some of the things I have mentioned here maybe considering calling me so your efforts don't wind up like the ones that I had to fix. It is just a waste of your money and time to do it wrong and to top it all off you have to live there too and see it everyday.
Well, it looks like we are going to get our first dose of winter in Iowa finally on January 12. Time for the ice and snow and shovels and salt again. Today's topic is about why you shouldn't put ice melt on your deck to get rid of the ice. While I know it is necessary in cases you should be aware of why this practice may remove a slipping hazard it will cause a structural failure of your wood deck over time and you won't even see it happening. 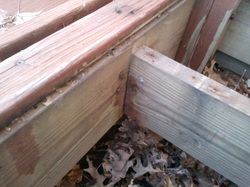 This picture shows a wood deck and its framing system. Here we see the joist (member on right) abutting the header and you see some dark rust spots on both. This is where the old galvanized metal joist hanger use to be. Now keep in mind I did NOT remove the hanger before taking the picture. This one and the seven others like it have been completely eaten away by the ice melt. In fact, there wasn't anything left below the framing members that resembled metal. Galvanized or not, the joist hanger would still corrode when exposed to ice melt. This deck FAILED this week with people on it. Now thank goodness no one was seriously hurt and the deck only had 8 inches to drop to the ground below, but imagine if it had been 8 feet. Now also imagine what ice melt does to any metal pipes under the deck. Yes, there was a GAS MAIN running to the building under the deck. This was a leak and possible explosion waiting to happen. The pipe was severely corroded too. The gas pipe was also re-routed to a new place where the ice melt will not be an issue. 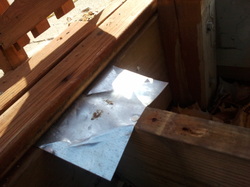 Knowing that my customer must maintain a safe and slip free surface they will need to continue to use this product on this ramp/porch area. However, to buy them so time before their next scheduled deck failure I painted the new joist hangers with galvanized paint on top of the factory galvanization and also installed this small piece of flashing to help divert ice melt/water run off. The ice melt will eventually eat through this flashing and start on the hanger again, but I bought them some time. Probably years. Bottom line, if you don't have to use ice melt products on your wood decks DON'T. If you do, keep in mind that a failure will happen because galvanized joist hangers just can't stand up to the corrosion caused by ice melt. The nails, screws and lags used on this deck were in the same condition. The best long term solution to this problem is to install a concrete ramp and porch. I'm sure this will be part of a capital improvement budget in the next few years.
Call me for an inspection if you have used ice melt products on your wood deck. Happy New Year everyone!!! May 2012 bring you many blessings and much enjoyment in your home. A good deck post footing is key to supporting your deck. One of the old methods was to dig a hole (legally to below frost depth of 42") set the post and fill with concrete. The new method is to dig a hole to below 42", bell out the bottom just a little and fill with concrete to above grade and anchor the post to the new concrete pier with a post anchor. Mixing the two methods is not the best idea. In the photo below we see an attempt to make a pier. The minimum diameter of a pier should be 8". I prefer 12" diameter. Obviously this one is shy of that mark. To make matters worse the builder put the post into the concrete. Well, as you can see the concrete broke. Here's why....  1. There is not enough concrete around the post. A few more inches would have helped a bit, but mother nature would have torn it apart anyway. 2. Notice the small gap between the post and the concrete. This allows water to seep in and when it freezes this pops the concrete loose. I was unable to see how far down the post went, but it has been my experience that some builders (or weekend warriors) don't dig all the way to frost depth. This was not the way to set this post. The preferred method is shown below. Notice that water will drain away, the pier is fully supported to frost depth, the anchor keeps the post attached to the footing and the deck stays in place and YOU stay on the deck with all of your party guests. 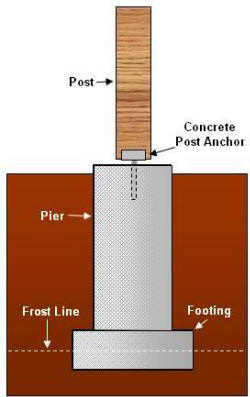 By ensuring that the deck is bearing on a footing below frost depth keeps the deck from heaving in the winter due to frost and over time working its way loose from the house. Yes, this does happen. I had to fix one last winter. The home builder only put the posts 32" in the ground with NO concrete piers. While this isn't the photo from that job this is what will happen. 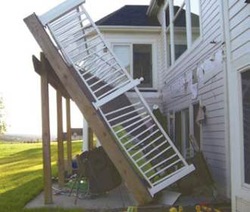 Digging a pier footing to the proper depth can be difficult at times, but it is REQUIRED and very, very necessary. This is not a place to cut corners. The entire rest of the project bears on this part of the project. Do it right. Do it once. Enjoy it forever.
The title of this blog comes to me from an old AC/DC song. No, not some tune that an electrician sings on the job. I'm talking about the boys from Down Under. It couldn't be more appropriate for the next few pictures. At the rate I am finding this kind of stuff out there does anyone really care about doing it right? Now some of these photos in this and previous blog entries were done by homeowners trying to save a buck, but will only succeed in costing them dearly down the road. However, the rest of these were done by paid contractors who the owner trusted to do the right thing. 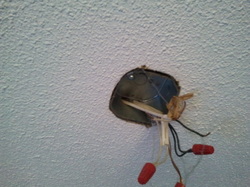 I do not leave work like this. First off, I need to give them credit on using a deep octagon steel box. However, this box was going to be used to support a ceiling fan. The box itself would have done it. The sheetrock screws used to fasten the box to a block of wood won't however. 1/4" Steel panhead or lag screws need to be used as the shear strength of those screws is rated for support like this. Secondly, notice where the white insulated romex wiring is coming into the box. There needs to be a clamp here. The wobbling from the fan will eventually wear the insulation away causing a direct fault, this means LOTS of sparks in layman's terms, and a possible fire. Thirdly, the metal box is not grounded. The bare ground wire should not only be connected to the other bare ground wires and have a lead to the green/bare wire on a fan or light, but also should be connected to the steel box to ground it as well. And forthly (is that a word?) just look at the crappy job they did trimming out the wires. The white sheathing of the romex should be removed along with the paper separator in the wire to a point where a clamp holds the wire. I guess since the installer didn't use a clamp he figured he'd just go ahead and make it a totally messed up job and leave this too. Please, please, please - if you have something like that shown above in your home you should repair it.  The picture above here is a proper fan rated support box. Romex wire clamps should be placed in the round wire knockouts to support the wires and keep them from rubbing on the box itself. Notice the green screw for attaching the ground wire to also. Imagine a ceiling fan falling on you while you sleep. You know you have one above your bed or couch. Do any of these things apply?
I'll keep finding these things. You keep reading and call me when you need help fixing them. 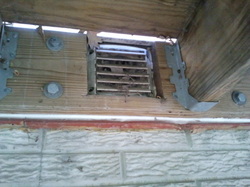 I was doing an investigation on a deck the other day. You won't believe the pictures on that one and I'll save it for another time, but this really jumped out at me. This is a clothes dryer vent. If you look closely you will see "gray areas" and "black areas". The black areas are the spaces left in this vent for air to pass. The gray areas are where it is completely clogged with lint. If the air can't pass from the dryer to the outside it takes much more electricity to dry your clothes. Secondly, and much more dangerous to you and your family, is that a clogged dryer vent can cause a fire. Imagine a flame coming out of the vent. Imagine that flame catching the wood deck on fire, then then melting the vinyl siding above, then catching the wall sheathing on fire and so on. Just how quickly can the fire department get there? The idea here - and the reminder for the week - please check your dryer vents and clean them out. If you have one of those "white flex hoses" venting your dryer you need to replace it. Those are no longer acceptable and for good reason. As it turns out, these combustible white plastic hose kits are deadly when improperly used as dryer venting and are the reason for many dryer vent fires. However, until recently they were still commonly sold as dryer venting. It was not until December 2006 that Underwriters Laboratories established UL 2158A “Clothes Dryer Transition Duct” which is an approved standard for flexible high temperature exhaust duct rated to 430 degrees Fahrenheit, that can also be used on both electric and gas dryers. Now be careful. When you go to the hardware store you may see flexible duct with a UL listing of UL 181B “Closure Systems for Use with Flexible Air Ducts and Air Connectors” however this standard is for flexible plastic and metal heating and cooling ductwork and vent fans such as in your bathroom. This standard UL 181B and these products are not for use as a dryer vent.Only flexible ductwork meeting UL 2158A can be used as dryer venting. Just because it is still sold in the hardware and home stores does not mean it is to be used as a dryer vent. They have other approved uses and you need to know the difference. When in doubt please call me. While I could build you a new home I'd rather just fix and remodel the one you are in now and should be for a long time to come if you take care of things like this. Now may be a good time to check this and also those 9 volt batteries in your smoke detectors.  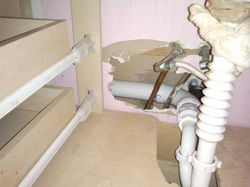 This picture was taken at a home that is under repossession by the bank. There are right ways and there are wrong ways to fix a leaking sink trap. Sink leaks can happen for a variety of reasons. One, the connections between various fitting can be loose or the rubber gaskets between have become hard and brittle and finally broken. Two, if there are metal pipe parts the will eventually corrode and crack and start to leak. All of this can be fixed, but you need to fix it properly. The picture to the left shows a sink with some newer plastic parts. These are a great substitute for the newer metal parts but still need to be installed correctly. In the upper left corner you will see the "big glob". The "big glob" is a professional trade term that refers to any material used in the wrong way to fix a simple problem. Here we see the "master craftsman" used a wash cloth and a large amount of plumbers putty (similar to play dough) to fix the leaking connection. Brilliant! This guy watched way too much "McGuyver" as a kid. He probably ran out of duct tape and wanted to have a more professional look by using plumbers putty on the sink. We won't even talk about the hole in the wall at the back of the cabinet that could have had the pipes installed better and patched up. I'll leave that to you to discuss for yourselves. Thanks for following and remember, I don't make this stuff up. It is out there and there is too much of it. This really turns off potential buyers when they see this. Because you didn't spend a few bucks to fix it right could cost you $1000s in the sale of your house just because of a bad impression. A potential buyer may be thinking, "If this kind of thing exists under the sink just how bad can the rest of the plumbing be?" I went on a call today to look at a garage door. The former owners of the house did the project shown below. I feel bad for the new owners and want to help out. This was installed by a friend of an uncle who had a racing buddy who parked in a garage one time - you get the idea here. Now don't go saying I am bashing racing. Left turn, after left turn, after left turn can be exciting. Now back to the story here.... No permits. No know-how. NO WAY!!! I gave them a price to fix it the right way and maybe even make it so you can't throw a cat through the space on the side. (of course it will be done right) Yes, the other side of the door looked just as bad. Sad thing is that they installed the door first and then did the fabulous job siding that needs to be completely removed and done over. It has been several years since they sided the house this way and all the while it has been raining, snowing and wicking moisture into the walls. I can't wait to see the damage under the siding. Please, please, please hire a professional to do your work. It does nothing but lower the value of your home when your work is done like this. If it is something that I can't do I will get the proper trade to do the work. Not everyone knows or should do everything. Would you do brain surgery on yourself? Even I would sub that one out. 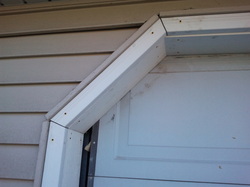 Below is a video of a window inspection I did this afternoon. The customer, who lives out of state, asked me to go over and inspect the work of a window company he hired. This is a long time customer that didn't remember that I did this kind of work. Shame on me for not keeping in front of my customers. I promise to do that from now on with this blog. While I do not like to BASH other contractors work, and I will not name the name of the company, this final product is absolutely unacceptable by any standard of quality. The project is just simply incomplete and the regular homeowner would never know. Link to Youtube Video When you hire a contractor there is an element of trust that goes with it. Some disputes arise from unclearly communicated expectations by both parties. The example in this video is just plain and simple poor work and poor use of material. I'm done now. I am sure you all get the point. I am pretty sure my customer will be calling me to fix this mess or help him find someone that I trust to do it right if I can't get to it. Yesterday I visited a home that was vacated and under foreclosure. The realtor tells me that the homeowner tried to fix up this home to add value to it and sell it on his own. He failed. He failed because he did not have a clue what he was doing. I spent over 3 hours at the home putting together a list of things that needed to be fixed, changed, finished and CORRECTED. What I saw was very disturbing. The homeowner installed a few new windows to replace the poorly built and leaking old ones. While this would normally add value to a home and be appreciated by future buyers he did it completely wrong. Take a look at this picture. 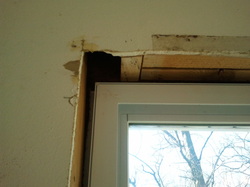 Notice the upper left corner of the picture. What you see here is the original header and part of the trimmer stud that supported the left end of the header for the original window. The homeowner went to the local box store, bought a stock size window, tore out the old one and attempted to put the LARGER stock size window in without reframing the opening. The roof load is now pushing down on the header and transfering the load to the window. The header should have been removed and a LONGER header installed with proper bearing from header to the floor. He thought he could just close this up with some trim and sell his home with "new windows".
Besides the structural issues here, the window was not installed properly with Tyvek wrap and tape at the perimeter, caulking, foam perimeter insulation or proper fasteners. It will now cost hundreds of dollars per window to correct this and even more if the windows can not be salvaged. The home can not be sold in this condition. Bottom line, if you don't know what you are doing please stop before it gets worse. Hire me as a consultant if anything and get the job done right. There are many more photos like this to post. Stay tuned.
Start blogging by creating a new post. You can edit or delete me by clicking under the comments. You can also customize your sidebar by dragging in elements from the top bar.
|
Hitting Home BlogAuthorJon Bronemann - author of "The Hitting Home" blog. Check it out and you will see what I see everyday and why hiring a quality contractor is so very, very important. Seeing is believing and it really does "Hit Home". Archives
December 2023
Categories
All
|


 RSS Feed