Helpful Articles
What to Do In a Flood Situation
Sometimes floods develop slowly and forecasters can anticipate where a flood will happen days or weeks before it occurs. Oftentimes flash floods can occur within minutes and sometimes without any sign of rain. Being prepared can save your life and give you peace of mind. After the Houston and southeast Texas flooding as a result of Hurricane Harvey in August 2017 I made a few observations. The following is not a complete list, but can help in emergency planning.
Create a Communications Plan
- Have contacts of family and friends WRITTEN DOWN and included with your emergency pack.
Assemble an Emergency Kit
- Include flashlights, batteries, small knife, plastic sheeting, medications, water, high energy snack bars,
Know Your Risk
- Know where your home is located in regards to the water shed and water ways. Understand what the flood level elevations mean to your particular property and how separated your are by higher land and flood protection. Consider what may happen to YOUR area should that protection fail.
Sign Up for Notifications
- Sign up for your local emergency management alerts, local news and weather channel apps. The information you will receive from these places is a great source in an emergency. The Advanced Hydrologic Prediction Service provides RSS feeds for observed forecast and alert river conditions to help keep the public informed about local water conditions.
Prepare Your Home
- Realize that you may not be coming back for a long time. Put your important items up high. Take important identification papers, insurance papers, and cash with you. Shut off the gas and the electric power if it is safe to do so at the main valve and breaker in the panel.
Prepare your Family/Pets
- Take any pet medications with you. If you need to go to a shelter take a kennel with you. Most shelters will not admit pets unless they are kenneled. Don't forget a leash as well.
Charge Your Essential Electronics
- Charge you electronics. Take charging cables and "brick batteries" with you. Remember to put your phone on "battery saver mode" and turn down the screen illumination level to conserve on battery life.
Leave
- GET OUT! When the local authorities tell you to evacuate you should do exactly that. Proper emergency planning is done weeks and and months ahead of time. Develop a network of friends and family that you can rely on that are in different areas. The neighbor next door, down the street and probably across town will be experiencing the same emergency situation that you are. Leave the area. The government will NOT be coming immediately to help you. Plan to save yourself and not stress the emergency services. Emergency services are for people who are not able to help themselves. Able bodied people have a responsibility to help themselves and those that can't.
Crawlspace Insulation and Moisture Barriers
In many respects, crawlspace walls are just short basement walls. Exterior foam and foam-form insulation systems can be used. However, interior crawlspace wall insulation is usually either foam board or draped insulation. If foam insulation is used, it extends from the top of the foundation to the top of the footing. The cavity formed by the rim joist should be filled with fiberglass batts or a foam-in-place product. Most fire codes allow up to 2 inches of polystyrene exposed on the interior of a crawlspace before covering is required. You will see most new homes have the band joist pockets above the foundation wall insulated with spray foam.
If crawlspaces are insulated with fiberglass or mineral wool batts, the batts are usually tacked to the sill plate and draped down and onto the floor. Four-foot-wide batts encased in a plastic cover work well when installed horizontally. Conventional 16- or 24-inch-wide batts leave voids between the batts and do not perform as well.
Some jurisdictions require a ventilated crawlspace to help control moisture. Vent requirements are significantly reduced if the floor of the crawlspace is covered with plastic sheeting with edges overlapped and taped, or spray foamed to the wall, to reduce crawlspace moisture. If required, install operable vents so they can be closed. Don’t forget to fill the rim joist space with fiberglass batt or foamed-in-place foam to complete the insulation treatment.
The floor over the crawlspace can also be insulated. This raises the thermal envelope from the crawlspace walls to the floor. While this technique offers many advantages, piping must be freeze-proofed, and heating and cooling ducts must also be insulated.
Crawl space venting is generally viewed as good practice despite the obvious moisture problems that occur when outside air with a dew point higher than interior crawl space surface temperature is permitted to enter a crawl space. Unvented, conditioned crawl spaces with insulation on the perimeter solve this problem. Unvented, conditioned crawl spaces with insulation on the perimeter perform better in terms of safety and health (pest control), comfort (warm floors, uniform temperatures), durability (moisture) and energy consumption than passively vented crawl spaces with sub floor insulation.
Perimeter insulation rather than floor insulation performs better in all climates from an energy conservation perspective. The crawl space temperatures, dew points and relative humidities track that of the house. Crawl spaces insulated on the perimeter are warmer and drier than crawl spaces insulated between the crawl space and the house. Cold surfaces that can condense water are minimized when crawl spaces are conditioned.
Wintertime ventilation makes crawl spaces colder and increases the heat loss from the home – venting crawl spaces wastes energy, and can lead to freezing pipes and uncomfortable floors.
Crawl spaces should be designed and constructed as mini-basements, part of the house – within the conditioned space. They should be insulated on their perimeters and should have a continuous sealed ground cover such as taped polyethylene. They should have perimeter drainage just like a basement when the crawl space ground level is below the ground level of the surrounding grade.
Part of a standard home inspection is reviewing any crawlspace areas when accessible and safe to do so. Perimeter and floor insulation are reviewed, moisture barriers noted, duct sealing reviewed, and mechanincal and electrical systems inspected. These are just a few of the items reviewed in a crawlspace inspection.
For your complete home inspection in Cedar Falls, Waterloo, Waverly, Dike, Jesup, Independence, Oelwein, Dysart, Sumner, Tripoli, Traer, Iowa Falls, Reinbeck, Grundy Center or anywhere in between in Iowa call Jon Bronemann Home Inspections, LLC at 319-239-5880 or visit the web at www.jbch.us.
Sources: buildingscience.com and internachi.org
|
Water Damage Concerns
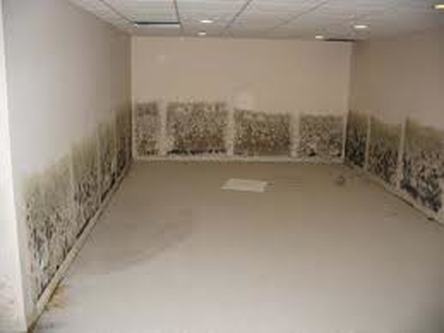
Basements are typically the area of a structure most at risk for water damage because they are located below grade and surrounded by soil. Soil releases water it has absorbed during rain or when snow melts, and the water can end up in the basement through leaks or cracks. Water can even migrate through solid concrete walls via capillary action, which is a phenomenon whereby liquid spontaneously rises in a narrow space, such as a thin tube, or via porous materials. Wet basements can cause problems that include peeling paint, toxic mold contamination, building rot, foundation collapse, and termite damage. Even interior air quality can be affected if naturally occurring gasses released by the soil are being transmitted into the basement. |
|
Properly waterproofing a basement will lessen the risk of damage caused by moisture or water. Homeowners will want to be aware of what they can do to keep their basements dry and safe from damage. Inspectors can also benefit from being aware of these basic strategies for preventing leaks and floods.
Properly waterproofing a basement will lessen the risk of damage caused by moisture or water. Homeowners will want to be aware of what they can do to keep their basements dry and safe from damage. Inspectors can also benefit from being aware of these basic strategies for preventing leaks and floods.
Prevent water entry by diverting it away from the foundation.
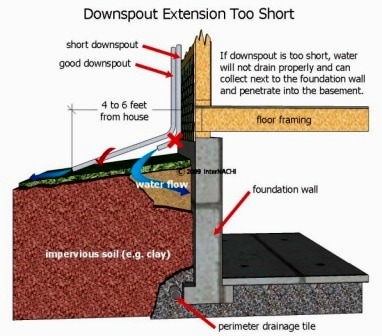
Preventing water from entering the basement by ensuring it is diverted away from the foundation is of primary concern. Poor roof drainage and surface runoff due to gutter defects and improper site grading may be the most common causes of wet basements. Addressing these issues will go a long way toward ensuring that water does not penetrate the basement.
Here are some measures to divert water away from the foundation:
- The finish grade should be sloped away from the building for 10 to 15 feet. Low spots that may lead to water pooling should be evened out to prevent the possibility of standing water near the foundation.
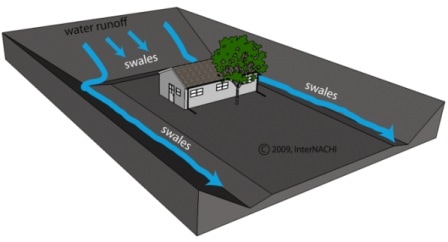
- Shallow ditches called swales should be used in conditions where one or more sides of the building face an upward slope. A swale should slope away from the building for 10 to 15 feet, at which point it can empty into another swale that directs water around to the downhill-side of the building, leading it away from the foundation.
Repair all cracks and holes.
If leaks or seepage is occurring in the basement's interior, water and moisture are most likely entering through small cracks or holes. The cracks or holes could be the result of several things. Poor workmanship during the original build may be making itself apparent in the form of cracks or holes. Water pressure from the outside may be building up, forcing water through walls. The house may have settled, causing cracks in the floor or walls. Repairing all cracks and small holes will help prevent leaks and floods.
Here are some steps to take if you suspect that water is entering the basement through cracks or holes:
Apply sodium-silicate sealant to the walls and floor.
Once all runoff has been thoroughly diverted away from the foundation, and all cracks and holes have been repaired and no leaking is occurring, a waterproof sealant can be applied as a final measure.
Sodium silicate is a water-based mixture that will actually penetrate the substrate by up to 4 inches. Concrete, concrete block and masonry have lime as a natural component of their composition, which reacts with the sodium silicate to produce a solid, crystalline structure which fills in all the microscopic cracks, holes and pores of the substrate. No water vapor or gas will be able penetrate via capillary action because the concrete and masonry have now become harder and denser from the sodium silicate.
Here are some steps and tips for its application:
For your complete home inspection in Cedar Falls, Waterloo, Waverly, Dike, Jesup, Independence, Oelwein, Hudson, Reinbeck, Clarksville, Shell Rock or anywhere in between in Iowa call Jon Bronemann Home Inspections, LLC at 319-239-5880 or visit the web at www.jbch.us.
If leaks or seepage is occurring in the basement's interior, water and moisture are most likely entering through small cracks or holes. The cracks or holes could be the result of several things. Poor workmanship during the original build may be making itself apparent in the form of cracks or holes. Water pressure from the outside may be building up, forcing water through walls. The house may have settled, causing cracks in the floor or walls. Repairing all cracks and small holes will help prevent leaks and floods.
Here are some steps to take if you suspect that water is entering the basement through cracks or holes:
- Identify areas where water may be entering through cracks or holes by checking for moisture, leaking or discoloration. Every square inch of the basement should be examined, especially in cases where leaking or flooding has not been obvious, but moisture buildup is readily apparent.
- A mixture of epoxy and latex cement can be used to fill small hairline cracks and holes. This is a waterproof formula that can help ensure that moisture and water do not penetrate basement walls. It is effective primarily for very small cracks and holes.
- Any cracks larger than about 1/8-inch should be filled with mortar made from one part cement and two parts fine sand, with just enough water to make a fairly stiff mortar. It should be pressed firmly into all parts of the larger cracks and holes to be sure that no air bubbles or pockets remain. As long as water is not being forced through basement walls due to outside pressure, the application of mortar with a standard trowel will be sufficient if special care is taken to fill all cracks completely.
- If water is being forced through by outside pressure, a slightly different method of patching with mortar can be used. Surface areas of walls or floors with cracks should first be chiseled out a bit at the mouth of the crack and all along its length. Using a chipping chisel and hammer or a cold chisel, cut a dovetail groove along the mouth of each crack to be filled, and then apply the mortar thoroughly. The dovetail groove, once filled, should be strong enough to resist the force of pressure that was pushing water through the crack.
Apply sodium-silicate sealant to the walls and floor.
Once all runoff has been thoroughly diverted away from the foundation, and all cracks and holes have been repaired and no leaking is occurring, a waterproof sealant can be applied as a final measure.
Sodium silicate is a water-based mixture that will actually penetrate the substrate by up to 4 inches. Concrete, concrete block and masonry have lime as a natural component of their composition, which reacts with the sodium silicate to produce a solid, crystalline structure which fills in all the microscopic cracks, holes and pores of the substrate. No water vapor or gas will be able penetrate via capillary action because the concrete and masonry have now become harder and denser from the sodium silicate.
Here are some steps and tips for its application:
- Special care should be taken when applying sodium silicate. It is an alkaline substance and, as such, can burn skin and eyes if it comes into contact with them. Inhalation can also cause irritation to the respiratory tract.
- Sodium silicate must be applied only to bare concrete, concrete block or masonry that has been cleaned thoroughly and is free of any dirt, oil, adhesives, paint and grease. This will ensure that it penetrates the substrate properly and fills in all microscopic cracks. It can be applied using a garden sprayer, roller or brush to a surface that has first been lightly dampened with a mop or brush. Apply two to three coats to the concrete, waiting 10 to 20 minutes between each application. Concrete block and masonry will take three to four coats, with the same 10 to 20 minutes between applications. Any excess should then be wiped away. Sodium silicate should not be over-applied or it will not be completely absorbed by the substrate, leaving a white residue.
- Paint can then be applied without fear of water vapor getting trapped between the paint and the wall, which could eventually cause blistering and peeling. Adhesives for tile or floor covering can also be used more effectively, once the substrate has been sealed.
For your complete home inspection in Cedar Falls, Waterloo, Waverly, Dike, Jesup, Independence, Oelwein, Hudson, Reinbeck, Clarksville, Shell Rock or anywhere in between in Iowa call Jon Bronemann Home Inspections, LLC at 319-239-5880 or visit the web at www.jbch.us.
Windbreaks
Windbreaks are dense rows of trees and shrubs designed to reduce wind speed before it reaches a building. These landscape elements provide numerous other perks for the homeowner, their neighborhood and the environment.
Some of the advantages provided by windbreaks, beyond simple wind mitigation, include the following.
Windbreaks work either by deflecting the wind up and over a building, thereby forming a protective wind shadow, or by catching it to reduce its speed. And as the windbreak captures the winter wind, so too does the wind chill diminish. For example, if the outside temperature is 12° F (-11° C), a windbreak can reduce a 20-mph wind to 5 mph, and the wind chill will be reduced from -22° F (-30° C) to a more bearable 8° F (-11° C).
The best windbreaks block wind close to the ground by using fast-growing trees and shrubs that have low crowns. Deciduous trees, while they are favored as shade trees during the summer, lose their leaves in cold weather, which makes them less effective than evergreens at stopping the frigid winter wind. The best choices are dense, fat, fast-growing conifers that will mature to a height higher than the roof. These qualities may be found with Norway, white and Colorado blue spruce.
Tips
January 2017
Windbreaks
by Nick Gromicko
Windbreaks are dense rows of trees and shrubs designed to reduce wind speed before it reaches a building. These landscape elements provide numerous other perks for the homeowner, their neighborhood and the environment.
Some of the advantages provided by windbreaks, beyond simple wind mitigation, include the following.
- Many animals rely on windbreaks. Food, shelter from severe weather, nesting sites, and a means of escape cover are all provided by the vegetation that composes a windbreak. For example, the planting of windbreaks during the Dust Bowl of the 1930s is believed to have allowed the expansion of woodland birds and other creatures, such as Mississippi kites and fox squirrels. Birds, in particular, are known to rely on windbreaks for temporary cover during winter storms. Even large mammals, such as white-tailed deer, use windbreaks for cover, food and fawning. Employ a variety of trees and shrubs in your windbreak to create an abundance of different kinds of nuts, seeds and berries, which will, in turn, attract a diversity of wildlife.
- While any vegetation will increase the appeal of an otherwise barren yard, a uniform, well-maintained windbreak can actually increase property values with their pleasing aesthetics. Also, they allow the homeowner to strategically screen out undesirable sights.
- Windbreaks are effective for noise deflection. Windbreaks reduce the infiltration of traffic noise into a property by absorbing and deflecting it with leaves and large branches. In addition, traffic noises will be replaced with the sounds of rustling leaves or the singing of birds that are drawn to the vegetation.
- Windbreaks assist agriculture. According to the University of Florida’s School of Forest Resources and Conservation, "a well-designed windbreak located in the direction of a prevailing wind can increase crop yield, reduce soil erosion, influence microclimate around the crops, increase irrigation efficiency, and control the spread of some pathogens." Erosion, in particular, is a serious threat to farmers. By clearing trees from the Western regions of Canada and the United States, farmers in the 1930s inadvertently encouraged evaporation and subsequent erosion that were largely responsible for the infamous Dust Bowl. Although rains eventually remedied the situation, farmers learned to place windbreaks around their lands to keep soil moist during droughts.
- Windbreaks provide snow control. A properly placed windbreak will prevent snow drifts in areas such as driveways and building entrances. Valuable time and effort can then be spent on activities other than snow removal.
Windbreaks work either by deflecting the wind up and over a building, thereby forming a protective wind shadow, or by catching it to reduce its speed. And as the windbreak captures the winter wind, so too does the wind chill diminish. For example, if the outside temperature is 12° F (-11° C), a windbreak can reduce a 20-mph wind to 5 mph, and the wind chill will be reduced from -22° F (-30° C) to a more bearable 8° F (-11° C).
The best windbreaks block wind close to the ground by using fast-growing trees and shrubs that have low crowns. Deciduous trees, while they are favored as shade trees during the summer, lose their leaves in cold weather, which makes them less effective than evergreens at stopping the frigid winter wind. The best choices are dense, fat, fast-growing conifers that will mature to a height higher than the roof. These qualities may be found with Norway, white and Colorado blue spruce.
Tips
- For maximum protection, plant your windbreak at a distance from your home of three to five times the height of the mature trees. Studies have shown, however, that the effective distance of wind reduction is sometimes as high as 30 times the height of the windbreak, depending on the tree species.
- Do not plant trees too close to the home’s south side, as this will reduce the warmth supplied by the winter sun.
- Arrange windbreaks in multiple rows to increase their effectiveness.
- Do not prune the lower branches of the windbreak, as this will increase the wind speed near the ground.
- Thin the trees and shrubs as they grow to ensure that competition does not jeopardize the health of the windbreak. For instance, you can plant trees 3 feet apart, but then you should remove every second tree when their crowns begin to intersect.
- Incorporate numerous plant species in the windbreak to impede wind from ground level to the treetops. Even non-living yard features, such as walls, fences and raised soils, can be incorporated into a single windbreak.
- Decide which direction the prevailing winds come from in your area so you know where the best places are to plant the windbreak.
- Be careful to not plant large trees too close to the home, as they may fall during a storm, shed leaves or needles on your roof, allow pests to access your roof, or even penetrate your basement walls with their root structure. If you are experiencing any of these conditions, be sure to talk about it with your InterNACHI inspector during your next scheduled inspection.
- Arrange the windbreak in such a way that it will provide a conduit for breezes and desired winds.
January 2017
Windbreaks
by Nick Gromicko

For your professional home inspection by a certified, experienced, and insured home inspector in Cedar Falls, Waterloo, Waverly, Shell Rock, Janesville, Finchford, New Hartford, Clarksville, Parkersburg, Aplington, Kesley, Stout, Fern, Sinclair, Dike, Wellsburg, Holland, Grundy Center,Reinbeck, Dinsdale, Morrison, Zaneta, Voorhies, Gladbrook, Traer, Buckingham, Dysart, Hudson, La Porte City, Garrison, Vinton, Mt Auburn, Brandon, Shady Grove, Urbana, Rowley, Independence, Jesup, Evansdale, Elk Run Heights, Dunkerton, Klinger, Oran, Fairbank, Hazelton, Oelwein, Tripoli, Plainfield, Buck Creek, Iowa Falls, Ackley, Westgate, Frederika, Sumner, Iowa or Black Hawk, Bremer, Butler, Buchanan, Grundy, Tama, Benton counties call Jon Bronemann Home Inspections, LLC at 319-239-5880